How to Break Down a Katana
CAUTION:
you are working with a live sword blade that is designed to cut. If you feel you are unable to do this safely please do not attempt to disassemble your katana.
Step 1: Prepare Your Tools
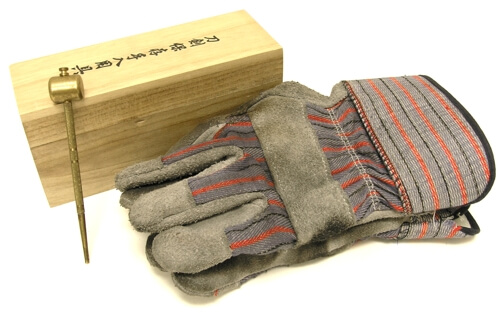
Before you get started you should get your tools and work area together. Everything you need is in the Traditional Sword Maintenance Kit that may have been included with your sword or is available on our website. The entire process to unmount the furniture off your blade will be done using this kit. You will need the brass hammer as well as the box itself will be used. If your box is damaged you can substitute it with a wood block or something solid of approximately the same height. The only additional things you may require are a good pair of leather work gloves and 100% attention as you are working with a very sharp blade.
Step 2: Identify the Mekugi
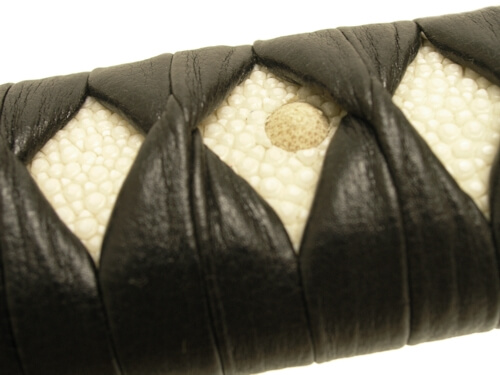
You want to inspect the handle of your sword (Tsuka) for a peg (Mekugi) or pegs. There will most likely be two pegs as it is common for todays production, however there may only be one as they were done traditionally. If you are having trouble locating the Mekugi, they maybe partially covered by the handle wrap (Ito). Once you have located the Mekugi, turn the sword over and you will notice that one side of the peg is larger than the other.
Step 3: Remove the Mekugi
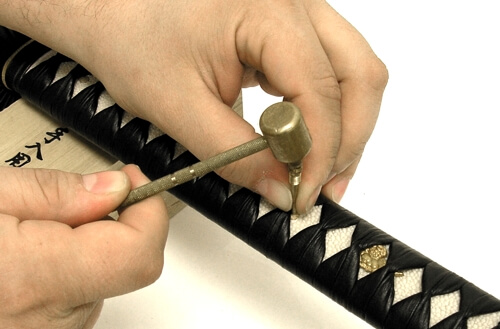
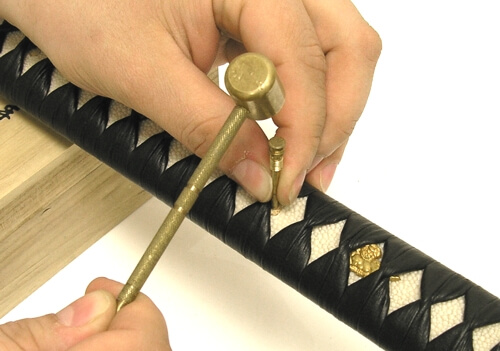
Now that you have located the peg(s). you want to place your sword handle over the box like pictured with the small side of the peg upward. Make sure that the reverse side of the peg is not on the box as the peg needs to drop out. Remove the punch that is located in the brass hammer from your kit. It is located in the hammer head and looks like a button. If you turn the button counter clockwise you can unscrew it from the hammer. Place the small end of the punch on the small side of the peg and gently tap it with the hammer until it comes free. Don't force it or strike to hard as you don't want to damage the peg. Use light repeated taps until it pushes through and falls out the other side. If you have more than one peg repeat this step for each making note of which peg goes to each hole. At this time you should inspect your Mekugi for damage or wear and replace them if necessary.
Step 4: Remove the Tsuka
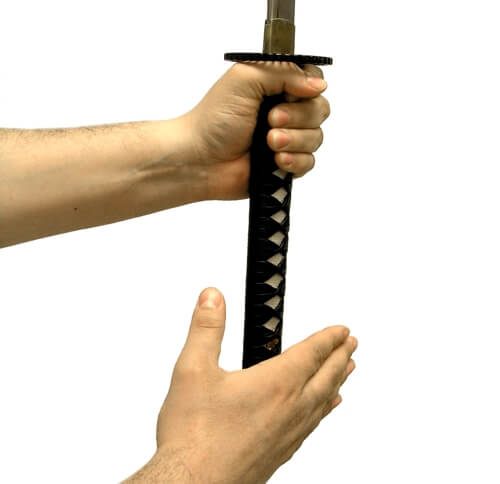
Now we are ready to remove the handle (Tsuka). Be very careful as the blade maybe loose in the handle and you do not want to lose control of it. Don't be tempted to grab the blade and pull it out as it will certainly cause injury or possibly a few fingers. Your handle should be fit tight enough that it won't slide off the blade easily so you may need to loosen it. Carefully lift the katana upright. Apply slight pressure on the guard (Tsuba) with your left hand. Gently tap the handle on the side a few times and this should loosen the blade. You should feel the guard and handle slowly pushing apart. If it doesn't loosen after a few taps continue tapping it from the left and the right gradually increasing the force applied until it comes free.
Step 5: Remove the Blades Furniture
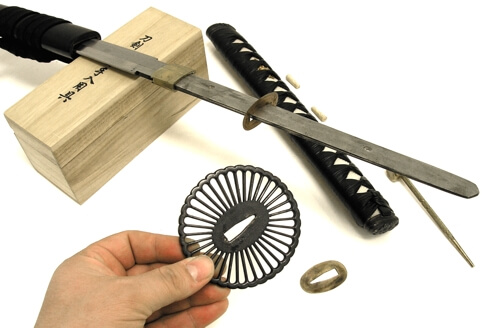
Once the Handle (Tsuka) is removed the rest is straight forward. As you remove each of the pieces keep them in order for re-assembly. You can now slide the seppa off the end of the tang followed by the guard (tsuba). The tsuba may be tight as it is normal for it to be struck with a punch pinching it to the tang during assembly. This can be freed easily by working it back and forth. Never force it or pull on the blade as I mentioned earlier as it could easily result in serious injury. Once the tsuba is free you can remove the seppa from the other side and all we should have left is the habaki. The habaki is fit very tightly around the blade and is very close to the cutting edge. If it doesn't slide off easily I recommend you leave it on. This is as far as you need to break down your katana for a good cleaning. If you decide to try, don't slip.
Step 6: Re-Assemble Your Katana
Now that everything is apart you should have a full understanding of how it goes back together. Presuming the habaki was left intact on the blade start with the first seppa. You will notice that it is notched around the edges. This notched side should be facing away from the tsuba. Now the tsuba can be slid back in place. If you like you can re-punch the tsuba to pinch it back down or simply have it held in place by the rest of the blades furniture. This will suffice for most people as well as myself. Now slide on the final seppa (notched side out) and then the handle (tsuka). You may need to tap the tsuka as you did when removing it so that the blade seats properly and the holes for the mekugi line up. Once they do the final step is to gently hammer the mekugi back in place with the brass hammer and you are finished! Congratulations you have broken down and re-assembled your katana.